Learn how to remove surgical sutures (nursing): Sutures (also called stitches) are used to close wounds either from an injury of some type or a surgical procedure.

There are various types of suture patterns used. The most common, which will be demonstrated in this article, is the simple interrupted suture.
In addition, there are these type of surgical suture patterns you want to be aware of as a nurse:
Now, keep in mind that not all sutures have to be removed. Some sutures are dissolvable, while others are not (hence the types you will be ordered to remove).
In addition, depending on the depth of the wound and location of the sutures, sutures can stay in for as little as 5 days, while others may stay in for 2 weeks.
Video Demonstration on Suture Removal
Steps on How to Remove Sutures
- VERIFY the physician’s order. You must have an order from a doctor before you can remove sutures.
- Explain the procedure to the patient, address concerns, and obtain their verbal consent to remove the sutures. Does this hurt the patient? No, not usually. They may feel tugging or pulling while you remove the sutures. However, if ordered, you can offer pain medication prior to removal because the site is still tender since it is a surgical site, if needed.
- Gather supplies! Supplies needed:
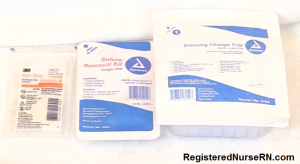
- suture removal kit, dressing change tray, steri-strips (always follow your hospital’s protocol when removing sutures because some facilities require you to wear sterile gloves….while others require you to just wear clean gloves….this video will demonstrate using sterile gloves.)
- Perform hand hygiene and don CLEAN gloves to remove the old surgical dressing, if present.
After doing this, assess the site and ask yourself?
- Is there infection present (excessive redness, warm to the touch, hard, oozing foul looking drainage or a smell)?
- Does the surgical site look like it is NOT ready to have the sutures removed? Are there open areas around the sutures that look like the skin has NOT “fused” back together?
- If you can answer YES to any of those questions, notify the physician BEFORE proceeding with the suture removal.
5. Doff gloves, perform hand hygiene, and prep supplies!
- Open dressing change tray and set-up supplies!
- The sterile gloves and drape should be at the top of the dressing change tray after you open it….carefully grab them and place them down in your work area.
- Open the sterile drape first (watch the video above to know how to properly open the sterile drape)

- Then open and DROP the suture remover kit supplies and steri-strips onto the sterile drape along with the antiseptic (you can keep it in the tray if you choose or place them on the drape). I prefer to keep them in the tray because there is a chance that once their opened they will leak onto the drape, which will contaminate the field.
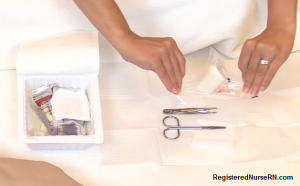
- Don the sterile gloves
- Open the sterile drape first (watch the video above to know how to properly open the sterile drape)
- The sterile gloves and drape should be at the top of the dressing change tray after you open it….carefully grab them and place them down in your work area.
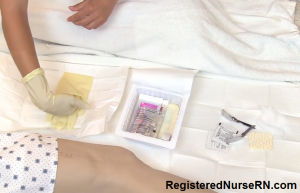
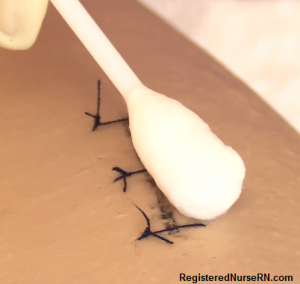
- Open the antiseptic swabs (most have 3 that come in a pack).

- Clean the surgical site with an antiseptic swab and discard.
- Let the site completely dry.
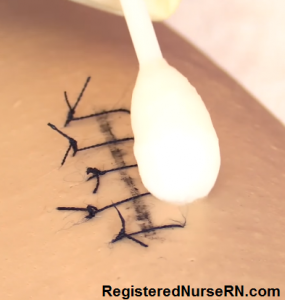
- Time to remove the sutures. FIRST, remove EVERY OTHER suture starting with the 2ndsuture.
- WHY? A complication of removing surgical sutures is WOUND DEHISCENCE….this is where the surgical site opens up prematurely before wound healing can occur. By removing every other suture first, this will help decrease this from happening. Before we remove the other sutures, steri-strips will be in place to protect the site.
- Start removing the sutures at the 2nd suture thread.
-
- IMPORTANT: when removing simple interrupted sutures do NOT cut the suture thread that is the longest BUT cut the suture thread that is closest to the skin near the suture knot (it will be the shortest thread next to the suture knot).
- WHY? When you cut the longest suture thread and go to remove it with the tweezers, it will cause the suture thread that has been exposed to the outside environment to pass through the skin (hence the wound) during the removal, which can lead to infection. However, cutting the shortest suture thread will bypass this from happening.
- IMPORTANT: when removing simple interrupted sutures do NOT cut the suture thread that is the longest BUT cut the suture thread that is closest to the skin near the suture knot (it will be the shortest thread next to the suture knot).
In addition, when “pulling” out the suture thread via the knot with the tweezers, pull OVER the incision line rather than away from it. WHY? Pulling the thread away from the incision line can cause tension and can lead to the incision opening.

So, take the tweezers and lift the knot with your non-dominant hand. Then take the scissors in your dominant hand (gives you the most control with the sharpest item) and cut the thread under the knot where the knot is closest to the skin (hence the shortest thread). Then slightly lift the knot up and pull over the wound.
Then look at the suture thread and make sure all of it was removed (it not all removed this can alter wound healing and the wound can open again).
- TIP: After removing each suture, be sure to place them in a gauze, and don’t forget to count them (document it too). WHY place the sutures in a gauze? This will help prevent the sutures from getting lost and allows you to count them…..remember this is considered a bio-hazard item and needs to be disposed of properly, according your to hospital’s protocol.

- Continue removing every other suture. Then clean the areas of where you removed the suture with a new antiseptic swab and let the site dry.
- Place steri-strips on the places you removed the sutures.

- Cut the steri-strips so about ¾ of an inch is on each side of the incision (or whatever the physician prefers or your hospital protocol dictates).
- In addition, space each strip 1/8 of an inch.
- NOTE:While placing the steri-strip, gently press one side down and then gently press the other side down. Do NOT pull or create tension while placing them…..steri-strips are very strong and could tear the skin if too much tension is created during placement.
- Remove the rest of the sutures.

- Note (remember) the numerical amount of sutures you removed.
- Clean the sites and let them dry.

- Place steri-strips.

- Optional: cover the site with a dressing if the site is at risk for friction. Is the site in the groin where the jeans will rub against it OR is the site at risk for moisture? If you place a dressing, EDUCATE the patient how to change it and given them supplies to do so.
- Educate the patient to let the steri-strips fall off naturally (takes about 10 days). Showers are best until the strips fall off.
- Discard the sutures and supplies per hospital protocol.
- Doff gloves
- Perform hand hygiene
- Document: number of sutures you removed, how the patient tolerated the procedure, complications (if applicable), how the site looked, education you provided to the patient
More Nursing Skills