Learn how to change an ostomy pouch. Patients who have experienced inflammatory bowel disease or trauma to the gastrointestinal system may have a GI ostomy (colostomy or ileostomy).
As the nurse, you must know how to change a pouching system.
In this article, you will learn how to change a pouching system. If you’re studying for NCLEX don’t forget to review our NCLEX review for colostomies and ileostomy.
How to Change an Ostomy Pouch
 What supplies will you need?
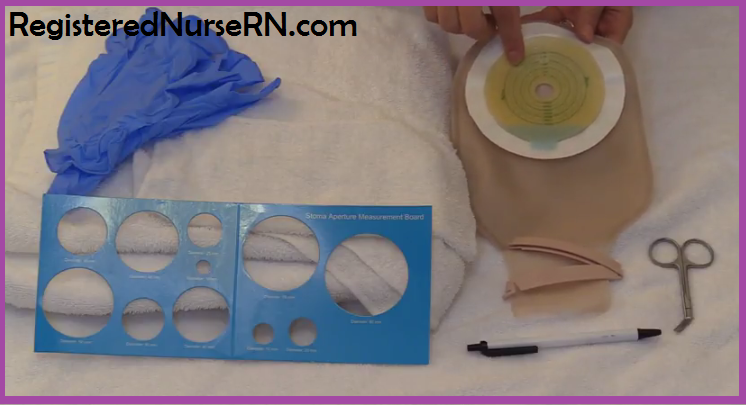
- Ostomy supplies
- Skin Barrier (also called wafer, flange or base-plate). This will attach to the pouch went using the one-piece system. It will be separate when using the two-piece system.
- Pouch (attached on the one-piece or separate on the two piece-system)
- Pouch Clip: used to close the bag….some pouches snap or Velcro shut and some pouches are closed systems where you discard the bag instead of emptying it.
- Stoma Measuring Card: if the patient recently had surgery you will want to measure the stoma with every pouch change because the stoma will shrink over time (it will be large and swollen after surgery and take a few months before it turns into normal size)
- Ostomy Scissors: these are specially designed to make a round cut when cutting the skin barrier…..they help prevent making jagged edges which can cause trauma to the stoma
- Pen: to outline the measurement on the skin barrier (if not already pre-labeled)
- Barrier Ring: If the skin surrounding the stoma has a lot of break down then it is a good idea to use a barrier ring around the site (in addition to the skin barrier) to help add extra protection to the skin.
- Towels and Wash Cloths: use warm water to cleanse the skin and stoma…may use mild soap but no soaps with perfumes, lotions, or alcohol in them
- Gloves: two pairs
 Things to Keep in Mind before Changing the Pouch
- Try to change when gut is least active (morning before breakfast…all people are different…ask the patient)
- Change system every 3-5 days (date and time it) and empty bag when 1/3 to ½ full
- Allow the patient to participant as much as possible; remember they will have to become independent with doing this
- Don’t use soaps with lotions or powders/creams, baby wipes or alcohol containing products on or around the stoma
- Assess for skin break down

Skin break down around the stoma
Steps for Changing an Ostomy Pouching System
- Gather supplies
- Perform hand hygiene and don gloves
- Place a towel under the site to protect patient’s skin and clothing
- Remove old pouching system by removing adhesive backing. You may have to use adhesive remover if you are having trouble removing it.
- Discard the system properly
- Clean around the skin and then the stoma with warm water and wash cloth (may mild soap without perfume or lotions)
- Dry skin dry (may need to trim hair if site is hairy which will allow the new pouch system to stick easily)
- Doff gloves, perform hand hygiene and don a new pair of gloves
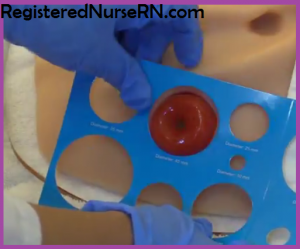 Measure stoma with measuring card…pick a measurement that is 1/8 inch larger than the stoma. The measurement should not be too big (which would allow stool to leak under the skin barrier) or too small (would constrict the stoma).
- Trace measurement onto skin barrier
- Use ostomy scissors to cut the measurement onto the skin barrier.
 12. May apply barrier ring around the stoma, if needed
13. Make sure the ostomy pouch is sealed close by using the clip or Velcro snap
14. Then apply skin barrier around the stoma (make sure you press down all the edges)…if using a two-piece system apply the bag to the skin barrier.
“Burping ” the Bag
Gas collects in the bag…teach the patient to expect this and how to release it
One-piece: un-clamp at bottom of bag (may want to do this in the bathroom or when others aren’t around because of the odor)
Two-piece: un-snap the pouch from the skin barrier, release gas, and snap back
Teach patient about limiting odorous foods
Inform about pouches that have filters that allow gas to vent out the pouch…may use pouch drops.
Learn about more Nursing Skills