Drawing blood is a common nursing skill that requires proper preparation, patient identification, equipment setup, and specimen collection technique. In this guide, we’ll walk through the blood draw process step by step, from verifying the order to sending specimens to the laboratory.
Step 1: Verify the Provider’s Order
Before drawing blood, verify the provider’s order and review exactly what has been requested.
Ask yourself:
- Are there any specific requirements before the blood draw?
- Does the patient need to be NPO (nothing by mouth)?
- Is the lab time-specific?
Examples mentioned include:
- Metabolic panels
- Iron studies
- Hormone levels such as cortisol
- Vancomycin trough levels
For vancomycin, many protocols require the trough level to be drawn approximately 30 minutes before the fourth dose.
Step 2: Verify the Correct Patient
Follow your facility’s protocol for patient identification.
Typically, this involves using at least two patient identifiers:
- Full name
- Date of birth
Have the patient state this information and compare it to the information on their armband.
Step 3: Assess the Patient and Provide Education
Ask the patient important questions before beginning the procedure.
Questions may include:
- Are you allergic to latex?
- Are you allergic to alcohol?
- Are you allergic to adhesives?
- Are you taking anticoagulants?
- Do you have a history of mastectomy?
- Do you have AV fistulas or grafts?
- How do you tolerate blood draws?
- Do you have a preferred site for blood collection?
Many patients know which veins work best for blood draws.
Also assess the patient for:
- IV infusions
- Edematous areas
- Infection
- Vascular compromise
Avoid using affected limbs or sites whenever possible.
Step 4: Gather Supplies
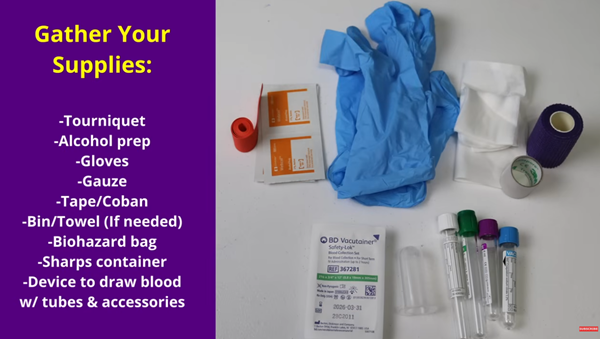
Collect all needed supplies before beginning the procedure.
Supplies include:
- Tourniquet
- Alcohol prep pads
- Gloves
- Gauze
- Tape or Coban
- Towel for positioning the arm
- Bin for supplies
- Biohazard bag
- Sharps container
- Blood collection device
For this demonstration, a winged butterfly needle set is used.
Step 5: Become Familiar With the Equipment
Review the packaging before use.
Check:
- Device type
- Intended use
- Needle size
- Expiration date
The winged butterfly needle set includes:
- Protective sheath
- Textured wings for gripping
- Needle gauge indicator
- Tubing
- Gray rubber stopper containing a needle
- Vacutainer tube holder attachment
- Safety activation mechanism
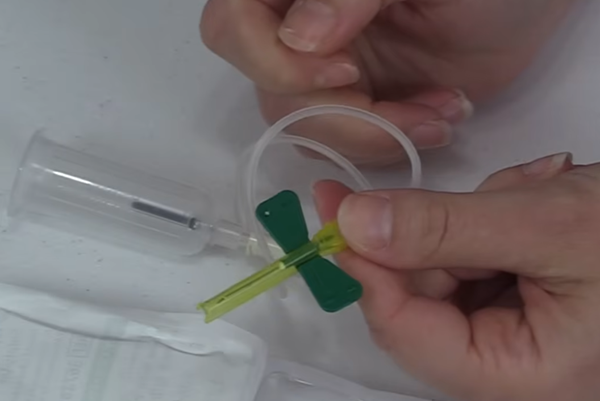
The tubing allows blood to travel from the vein into the collection tube.
The tube holder screws onto the butterfly set and allows collection tubes to be attached during the draw.
Step 6: Review Lab Tubes and Order of Draw
Lab tubes have different colored tops and may contain different additives.
Information found on the tube may include:
- Additive type
- Fill line or fill zone
- Patient identification area
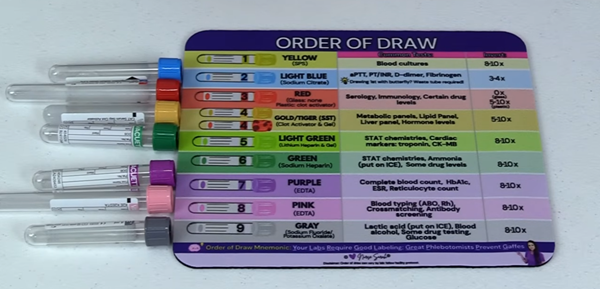
Order of Draw
- Yellow (Blood Cultures)
- Additive: SPS
- Invert 8–10 times
- Light Blue
- Additive: Sodium Citrate
- Invert 3–4 times
- Red
- Glass: No additive
- Plastic: Clot activator
- Invert 5–10 times for plastic
- Gold/Tiger Top (SST)
- Clot activator and gel
- Invert 5–10 times
- Light Green
- Lithium heparin and gel
- Invert 8–10 times
- Dark Green
- Sodium heparin
- Invert 8–10 times
- Lavender/Purple
- EDTA
- Invert 8–10 times
- Pink
- EDTA
- Invert 8–10 times
- Gray
- Sodium fluoride and/or potassium oxalate
- Invert 8–10 times
Order of Draw Reference

Never forget the order of draw with this bright, easy-to-read “Order of Draw” mouse pad or poster, designed for phlebotomists, nurses, and students who want accurate lab information at a glance.
This functional reference displays each lab tube color in the correct order, including additives, common tests, required inversion times, and a memory mnemonic, keeping essential details right at your fingertips while you study, chart, or work.
Perfect for study desks, nursing stations, labs, classrooms, and offices, this reference reinforces accuracy, confidence, and best practice without interrupting your workflow.
Whether you’re learning, teaching, or practicing, this mouse pad turns essential lab knowledge into a clean, colorful, and functional reference that supports safe, accurate blood collection.
Available at: NurseSarah.com
Mnemonic for the Order of Draw
Your Labs Require Good Labeling. Great Phlebotomists Prevent Gaffes.
Important Note About the Light Blue Tube
When using a butterfly collection set and the light blue tube is the first tube drawn, a waste tube must be used first.
This clears the air from the tubing before collecting the sodium citrate specimen.
NOTE: Always follow your facility’s protocol regarding waste tubes.
Step 7: Perform Hand Hygiene and Don PPE
Perform hand hygiene and apply appropriate PPE.
Arrange supplies in a way that allows easy access during the procedure.
Prepare:
- Butterfly collection set
- Gauze
- Collection tubes arranged in the correct order of draw
- Tape or Coban
For the demonstration in the how to draw blood video, the collection sequence is:
- White waste tube
- Light blue tube
- Green tube
- Lavender tube
Step 8: Apply the Tourniquet and Locate a Vein
Use the antecubital (AC) area of the arm, if possible. However, other sites like the forearm and hand can be used.
Apply the tourniquet approximately 3–4 inches above the intended insertion site.
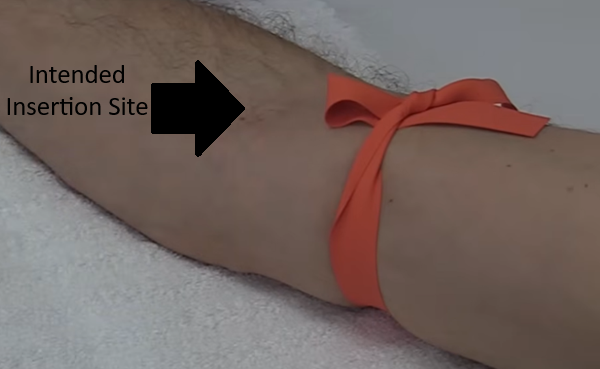
To apply:
- Place tension on both ends.
- Cross them into an “X.”
- Tuck one end halfway through for quick release.
Do not leave the tourniquet on longer than one minute.
If it remains on longer than one minute:
- Remove it.
- Wait two minutes.
- Reapply.
Palpate for a vein.
Veins should feel:
- Bouncy
- Squishy
- Non-pulsatile
Avoid structures that feel hard, cord-like, or have a pulse.
Step 9: Clean the Site
Remove the tourniquet and cleanse the site according to facility protocol.
In this demonstration:
- A back-and-forth friction motion is used.
- The site is cleaned for approximately 30 seconds.
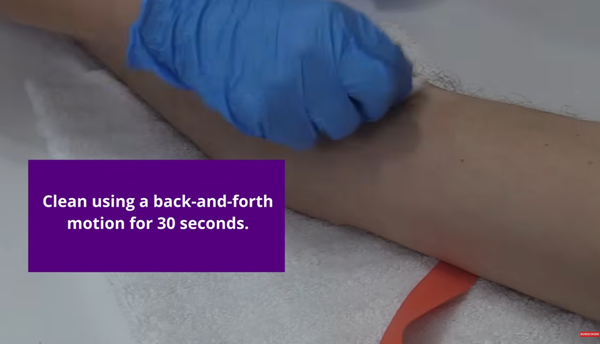
Allow the site to air dry completely.
Do not:
- Blow on the site
- Wave over the site
- Use gauze to speed drying
Step 10: Perform Venipuncture
Reapply the tourniquet.
Avoid touching the cleansed site.
Ask the patient to make a light fist. NEVER have the patient “pump the fist” or make a tight fist because this can alter lab tests.
Remove the butterfly needle sheath and ensure the tubing is uncoiled.
Anchor the vein by pulling the skin taut approximately 1–2 inches below the insertion site.
Insert the needle at a 15–30 degree angle.
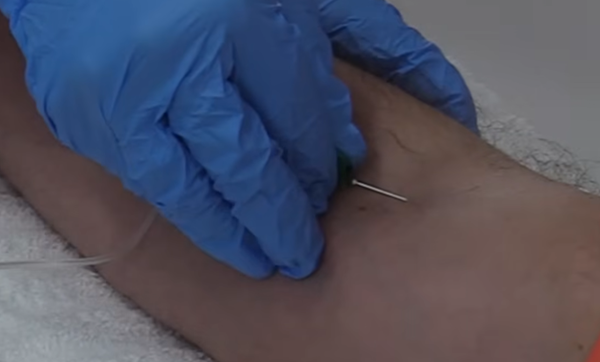
Watch for blood return.
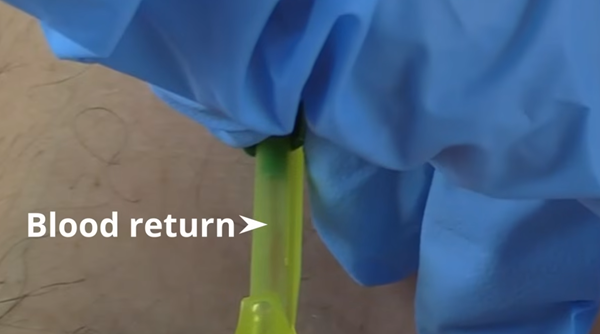
Once blood return is observed:
- Lower the insertion angle.
- Advance the needle approximately 1–2 millimeters.
- Stabilize the device.
Step 11: Collect the Blood Specimens
Attach the waste tube first.
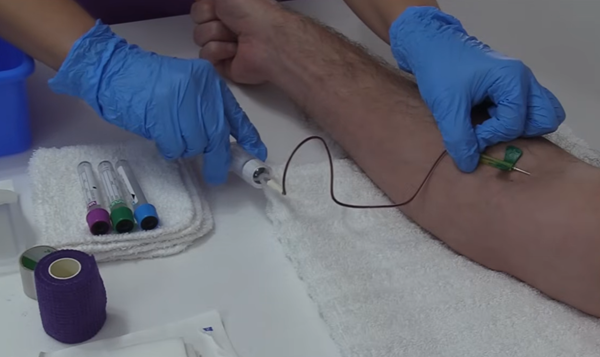
Once blood flow is established:
- Have the patient release their fist.
- Remove the tourniquet.
Allow the waste tube to fill approximately 3–5 mL.
Remove the waste tube and continue with the ordered collection tubes.
Light Blue Tube
Allow the tube to fill completely to the fill line.
Invert 3–4 times.
Green Tube
Allow the tube to fill to the fill line.
Invert 8–10 times.
Lavender Tube
Allow the tube to fill to the fill line.
Invert 8–10 times.
Allow each tube to fill from top to bottom and verify that the fill line is reached.
Step 12: Remove the Needle
Place gauze near the insertion site.
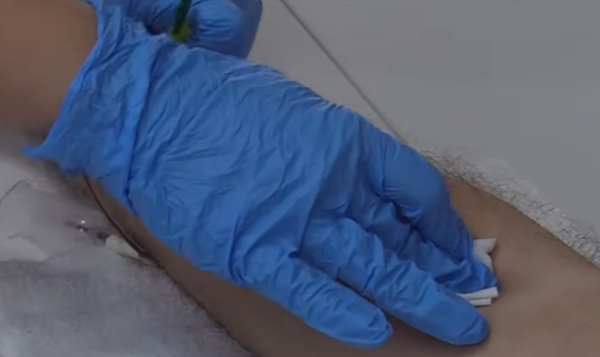
Remove the needle and immediately apply pressure with the gauze.
Activate the needle safety mechanism by sliding it forward.
Discard:
- Needle
- Tubing
- Holder
Place all sharps into the sharps container.
Continue applying pressure to the site.
Patients taking anticoagulants may require a longer period of pressure.
Step 13: Secure the Site
Inspect the site to ensure bleeding has stopped.
Apply tape or Coban according to patient preference.
When using Coban:
- Apply pressure over the site.
- Wrap around the arm.
- Avoid wrapping too tightly.
- Secure the material in place.
Step 14: Label and Transport Specimens
Label all tubes at the bedside while in the patient’s presence.
Place the specimens into a biohazard bag.
Then:
- Remove gloves.
- Perform hand hygiene.
- Send specimens to the laboratory.
Step 15: Document the Procedure
Document the blood draw according to facility requirements.
You may be interested in more Nursing Skills demonstrations here.
References:
Clinical and Laboratory Standards Institute. (2017). Collection of diagnostic venous blood specimens (7th ed., GP41). Clinical and Laboratory Standards Institute.
Greiner Bio-One North America, Inc. (n.d.). Best practices: VACUETTE® blood collection tubes—Order of draw and inversions [Educational poster]. https://www.gbo.com/fileadmin/media/USA/02_Downloads_Preanalytics/TECHNICAL_Posters_Info/L2243001RN_Blood_Collection_Tube_Educational_Poster.pdf
World Health Organization. (2010). WHO guidelines on drawing blood: Best practices in phlebotomy. World Health Organization. https://iris.who.int/handle/10665/44294